
I have to hand it to the Foodways staff. It was organized chaos in those two kitchens with 20 of us stomping around, grabbing food, pushing our way around the fire, jockeying for pots....you get the picture. They must have slept for a week after we left.
The meal was broken down into two courses, nine dishes in each course. My partner Eileen Mercer and I got worked on a chocolate pudding, which I have to say was the coo since I was put in charge of the sign up sheet for who was going to make what. Rank has its privilages, Ha! It was the crowing glory of the first course if I do say so myself.
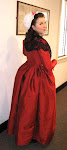
 That's Eileen to the left, me in the middle and Heather Menzel to the right. We are all members of the HFSDV by the way- The Historic Foodways Society of the Delaware Valley (NJ, PA, MD and DE). I'm currently on the Board serving as VP of programs. If anyone wants more info on the group e-mail me. I'll write about the group in another blog someday soon.
 The receipt is as follows: To Make a Chocolate Tart (Nott) "Mix a little milk, the yolks of ten eggs, with two spoonfuls of rice-flour, and a little salt; then add a quart of cream, and sugar to yoru palate, make it boil but take care it does not curdle; then grate chocolate onto a plate, dry it at the fire, and, having taken off your cream, mix the chocolate with it, stirring it well in, and set it by a to cool. then sheet a Tart-pan, put in your mixture, bake it. When it comes out of the oven glaze it with powder'd sugar and a red hot shovel.
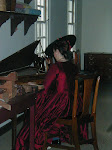
Eileen is holding a very large metal grater that we used to grate up a bar of period style chocolate made my Jim Gay. If you haven't seen Jim's video on the CW site on how to make cacao beans into chocolate then go take a peek. It's amazing. So he made this beautiful huge bar of period chocolate which he told us to grate up. We forgot how much he said and ended up using almost the whole bar. Turns out we should have used half....sorry Jim. I feel kinda bad since it takes an enormous amount of time to make just a little chocolate. Let me tell you also that the grater, not so good. Worn down and the chocolate got stuck between the holes but we did not give up.

While we took turns grating up that chocolate we put together our pastry cream and you can see Eileen there stirring it in a beautiful copper pot on the hearth. We used four cups of heavy cream, ten egg yolks, a spoonful of wheat flour (hey, you use what you have on hand) and a pinch of salt. Don't know how much sugar, we did as it said- to your taste. But it was, in the end, not as sweet as most modern folks would like. We liked it just fine. It was like eating a lovely dark chocolate bar. We had to keep a close eye on it so it wouldn't curdle.


Here is the cream all ready for the chocolate which you can see in the copper dish just above the handle. Now that's a lot of grated chocolate! And there is my lovely hand mixing in the chocolate.

 As we set that aside to cool I made the crust. I used the standard 2:1 ratio of flour to fat though I did eyeball it. The crust was made from white flour, butter, lard, a little salt and a spoonful of sugar. I cut the fats in using two knives, added some cold water and then quickly rolled it out. we then lined a nice high sided tart pan with the crust and poured in the filling. Karen from CW got our oven ready and in the pudding went. I don't know how long it actually took to set, probably no more than half an hour. The photo on the left is the pudding in the crust before baking, and the one of the right is still sitting in the oven.

They actually let us use a salamander to brown the meriange. If you've never worked with one before think of a pizza peel you see in any pizza shop, now make it out of metal and make it hotter than hell. The one we used was luck enough to have legs or we'd be screwed. The legs were placed on a board and then we dipped the round head of the salamander down over the meriange which promptly browned. It did loose heat faster than I thought it would though. That's me in the photo on the right with the salamander. Eileen is beating the egg whites on the right.

Tomorrow I'll show you the results of when I tried it on my own.
Mmmmmmmm...that looks so good!
ReplyDelete