Wednesday, February 10, 2010

Trim


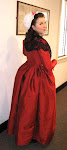
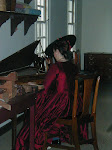
The pink dress is in the collection of the Colonial Williamsburg foundation. It is a pale pink silk dating to the 1770's. The photo on the left is the original gown which was in one of the drawers in the current quilted garment collections. Once a month they open the drawers and let you look at the garments up close and personal. This gown was also on display when they had the exhibit "What Close Reveal" but I didn't have a digital camera back then. Bummer. The one on the right is a modern reproduction of the gown made by Janea Whitaker (sorry if I've spelt it incorrectly), from the Millinery shop at Colonial Williamsburg.


Many of the work gowns I make (and wear) are devoid of any trim since they are plain linen, made to used as working garments, not fashion statements. But who doesn't like a little dressing up, even on an every day basis? Typically one does not see trim around the top neck line of a gown so this simple trim caught my eye.

To make it I began by ironing the fabric. I then decided that I would make the trim 2" in width. The size of your trim should be in proportion to your gown and the pattern on your gown. To make it an inch was too small, got lost in the print, but 3 inches was too big. Plus the ruler I was using was 2 inches in width…nice when a plan comes together.


I then cut strips of fabric using a scalloped edge rotary cutter. Though it looks like it is pinked it is actually a scalloped edge. This is period appropriate and works get if you can find one. I got mine at a fabric store where I also found a scissor with a scalloped edge. The difference between using the two is that the rotary cutter works faster when you are cutting strips of the same width and length of fabric. The scissor tends to move the fabric when you are trying to cut flat and straight.


Once I cut the strips out I then joined them together using a sewing machine. No need to finish the edges since it will be held flat against the gown and normally you tuck them under when you come to them but more on that later.

I then ironed the strips into an inverted box pleat- my favorite way to trim. Not only does it look nice it is historically correct. You can use a ruler to make sure that each pleat is the same width and the same distance apart. I've done so many of them that I can do it now without the ruler, the same with pleating the skirts onto the bodice.

They look accordion like when finished.

Starting at the front edge, pin the trim onto the neckline of the gown. I use two pins per pleat. This holds them securely into place, especially as you go around the curved areas. Remember to fold under the unfinished edge so that is tacked down. This way it will not fray and looks clean. Continue to pin the trim into place all the way around. Cut the strip if need be and tuck under the raw edge.


I tacked them into place by sewing them in the center of each pleat. Beginning with the first one I simple sewed through the center, making sure to bring the needle up and down in the same holes. I then ran the thread through the lining on the inside of the garment. This is to make sure the thread does not get caught or break and it makes the trim more secure.

I sewed the trim all the way around to the front and viola! Lovely simple box pleated trim. I also did the same trim for the sleeve edges.

Trimming a Gown

I know I said I was going to talk about the painting but I thought since I just had to re-do the gown on my last few postings I'd continue with that. It's my sewing room's fault. No, really.

Okay, I have to confess. I have a sewing room all to myself which is cool except you sometimes can't see the floor. It's a small room but with way too much fabric and stuff, and did I mention the dolls? Hundreds of them. They are all loved and I wouldn't sell any of them except I can't move in that room most of the time.

So every once in awhile I clean it up and when I do I find the most wonderful things. Like the cream and red floral gown that I was working on. Lovely isn't it? I thought so too until I put it on the dress dummy and thought "hmmm, something is not quite right." I then put it on and guess what? See where the skirts attach to the bodice? Are you wondering WHY the skirts are so far back? Me too. And then I remembered. This was suppose to be a jacket with a full short skirt now a gown! That's what happens when you start a project, it gets lost for two months and then when you find it you forgot what the plan was.

Now, I could have just worn it that way, with the skirts towards the back. My new love is the 1780+, all those lovely transitional gowns. Skirts headed towards the back at that time but the print...not quite right for that.

What's a girl to do? You got it. I opened the bodice up, removed the skirts, made them come closer towards the front bodice closure, re-sewed everything back into place, finished the trim and viola! Ready for the hem tomorrow.

The trim is a simple reversed box pleat that I put around the neck line and the edges of the sleeves. I based it off an original in the Colonial Williamsburg collection. It is a lovely pink silk that I've gotten to see several times over the past few years, up close and personal. The ladies in the milliners actually made a copy of it as well. Got to hold that one.

Anyway,to make the trim I used a rotary cutter with a scalloped edge. Fiskar also has a scissor that will do the same edge. I'd love to have a pinking iron but have yet to find one that actually works well. (if anyone knows of someone who makes them let me know). It works well on cotton and on silk, even linen if you press hard enough.  With the silk though I use fray check.  I know, it's not period, but when you spend that much money on fabric why in the world would you want it to fray into ugly strings?

Tomorrow I'll post the instructions and the photo. Right now I have to go get rid of these hiccups.